This post is part 2 of Windows Notifications – The Things You Can Do. In Part 1, I showed you: how to turn notifications on and off; how to use Do Not Disturb; and, how to move notifications. In this post, I’ll show you a few other things you can do with them.
Windows Notifications – Part 2 – Time On The Screen
One of the complaints I often hear from customers is that a notification disappears so quickly, they can’t read it. Of course, when that happens, you can go to the Action Center (Learn all about this in the area below.) and see what it was. However, that is sometimes inconvenient and time-consuming. Instead, you can change the time a notification sits on your screen. The procedure is slightly different for Windows 10 and 11, so here are the procedures.
Windows 10
- 1) On the Start Menu, choose Settings (the cogged icon directly above the Power icon.)
- 2) On the right side of the window, click or tap “Ease of Access.”
- 3) The new windows should open to Display. If not, choose Display from the menu on the left.
- 4) On the right side of the window, scroll down until you find the subheading, “Simplify and personalize Windows.”
- 5) Under that heading, you’ll find “Show notifications for” and you’ll see a drop-down menu. Normally, this is on 5 seconds. Click the menu and choose the timing you’d like.
- 6) Close the Settings window and you’re good to go. If you decide the timing you chose was too much or too little, you can repeat these steps and try a different setting!
Windows 11
- 1) On the Start Menu, choose Settings (the cogged icon labeled “Settings.”)
- 2) On the left side of the window, click or tap “Accessibility.”
- 3) On the right side of the window, choose “Visual effects.”
- 4) On the right side of the window, find “Dismiss notifications after this amount of time.” There you’ll find a drop-down menu. Normally, this is set at 5 seconds. Click the menu and choose the timing you’d like.
- 5) Close the Settings window and you’re good to go. If you decide the timing you chose was too much or too little, you can repeat these steps and try a different setting!
The Action Center
In the section above, I mentioned the Action Center. In case you’re not aware, the Action Center is the area where you can see notifications that disappear from the screen. There are often other options you’ll find in the Action Center, particularly in Windows 10. The Action Center is located on the right side of the Task Bar and is accessed by clicking on its icon. The icon is different on Windows 10 than the one on Windows 11. Let’s have a look.
Windows 10
- The Action Center icon is to the right of the date and time and looks like a voice bubble you might see in a cartoon.

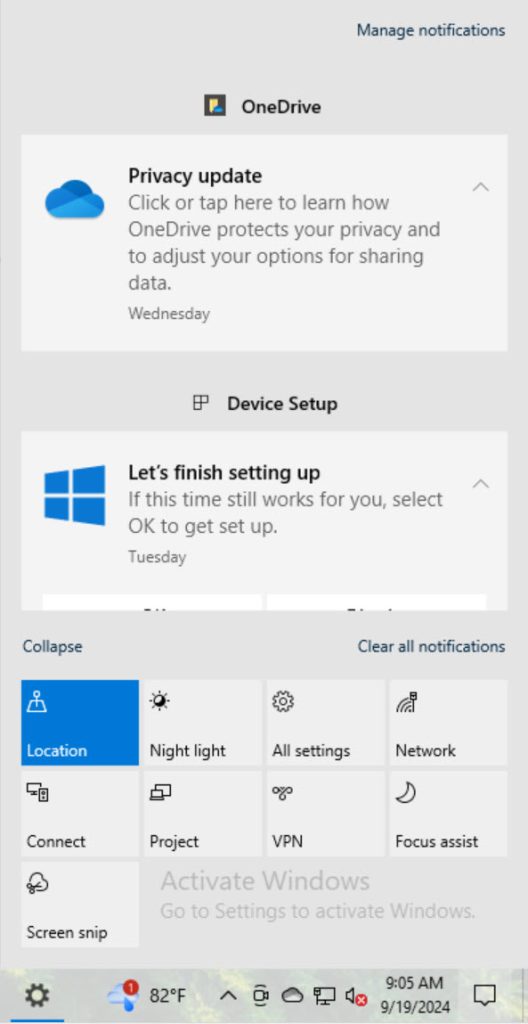
When you click on the icon, this is the menu that appears:

While you might see slightly different things in your Windows 10 Action Center, some things will be the same. Notifications are at the top. These are the alerts that appeared on the screen and then disappeared. At the bottom, there are buttons you can click to turn on and off certain activities or to reach the settings for those items. For instance, on my Win 10, I can click VPN and it will take me to the settings for using a VPN. Although mine doesn’t show it, Airplane mode is another button that often appears on a laptop computer. If you want to get online, this button should always be grey. (Blue indicates that an option is on.)
Windows 11
- The Action Center icon is to the right of the date and time and looks like a bell.

When you click on the icon, this is the menu that appears:

While you might see slightly different things in your Windows 11 Action Center, some things will be the same. Notifications are at the top. These are the alerts that appeared on the screen and then disappeared. At the bottom, you’ll see the Calendar. Just below that, you’ll see the quick access to Focus. You’ll also see that you can adjust the amount of time for Focus. (Remember, I covered Focus under the Do Not Disturb section in the previous post – Part 1.)
Windows Notifications – The Things You Can Do – Part 2 Conclusion
That’s about it for Notifications on Windows 10 and Windows 11. If you have any questions, be sure to use the comment area below!

